Friday, April 26, 2013

[FACEit] those blackhead removal masks weren’t cutting it so I had to try something else


I felt so bad about not giving you a solution to your blackheads in the last post that I had to try to find something that would give results.

Oatmeal Scrub

Put ¼ cup of oatmeal in a bowl.  Add 1 tablespoon of water (I used warm water) at a time until somewhat of a paste forms. Apply the mixture to your face and scrub for about a minute. 

I put a clump on my forehead, each cheek, the sides of my nose (because that's a big trouble are for me), and my chin.  Then I started to scrub, adding more of the mixture to my face as little bits fell off into the sink.  I recommend doing this over a sink because the oatmeal WILL fall off of your face. This mixture felt very awkward, I'm not going to lie.  It was mushy and soggy and strange.

I honestly had no faith in this scrub at all BUT IT WORKED!  It did not remove ALL of my blackheads but it got rid of most of them and the few it didn’t get rid of completely, it did remove partially.  The scrub lightened the blackheads that it wasn’t able to fully remove SO MUCH that they were barely even noticeable! It even made them easier to extract. 

This leads me to believe that the masks I told you about in an earlier post to remove blackheads, might be more effective used as a scrub for about a minute instead of a mask.

What blackhead clearing scrubs have you used and found effective?

FLASHBACK FRIDAY!


In Rome, blue paint was used to outline ______ because they were seen as a sign of beauty.


Do you know what the blue paint was used to outline?

Tune in later to find out!

Friday, April 19, 2013

FLASHBACK FRIDAY!


Egyptians were the first to use “cosmetics” to accentuate a specific part of their body.


Do you know what body part it was?

Tune in later to find out!

Thursday, April 18, 2013

[FACEit] Sally Beauty “Generic Value Products” are fantastic


My scalp is extremely dry during the winter.  One of my friends recommended buying Paul Mitchell Tea Tree Shampoo and Conditioner.  Apparently the shampoo and conditioner worked wonders for her scalp! I was so excited to buy the products and try them out. 

I ran into Sally Beauty to grab something else and figured I’d check to see if they had it.  I was in a bit of a rush but I saw both bottles, grabbed them and finished running the rest of my errands before I could head home. 

When I got home I realized I had bought these instead…


Even though they weren’t exactly what I was looking to buy I figured I might as well try them.  I had nothing to lose, right? 

Boy am I glad I did! They are amazing.  I had immediate results.  Within a week I noticed my scalp wasn’t flaking anymore.  It wasn’t itching.  It just kept improving!

As it turns out, Sally Beauty sells a whole line of Generic Value Products.   They range from flat irons to finishing sprays and everything in between. 

So, instead of spending about $20 on an 8 oz. bottle of shampoo and another $20 on the 8 oz. bottle of conditioner I spent about $15 TOTAL on a 16 oz. bottle (twice the size!) of Generic Value Product Tea Tree Oil Shampoo and a 16 oz. bottle of Generic Value Product Tea Tree Oil Conditioner.  I have never been happier to have accidentally bought the wrong product because I was in a rush.  All I saw on the bottle was “tea tree oil” and “Paul Mitchell” and just assumed it was the right stuff.  I was wrong but IT WAS EVERN BETTER!

Thursday, April 11, 2013

[FACEit] nobody likes blackheads so how do we get rid of them?


Blackheads form when hair follicles get clogged with dirt, oil, and bacteria.  When exposed to air, the oil and bacteria turn black, making blackheads more noticeable and sometimes embarrassing.  Treatments can be expensive and/or have negative side effects.  

Thank goodness we can make blackhead-clearing scrubs and masks ourselves!  There are so many different remedies that claim to work out there so I tried 2, hoping one would work. 

Both recipes are very simple but they also get a little messy so I wouldn’t wear clothing that you’d be upset about ruining.

The almond honey mask.

Put 1 tablespoon of almonds into a food processor (I just used a blender) until they are ground into fine crumbs.  Then add a tablespoon of honey and apply to your face.  Leave for about 20 minutes.


This remedy is supposed to clean up your skin and draw out impurities and blackheads.  Not only is it a little bit of a challenge to spread on your face but it also starts dripping down your face and sometimes dripping off your face.


The baking soda and water mask.

Put ¼ cup of baking soda in a bowl.  Add water until it forms a paste.  I used less than ¼ cup of water.  You want to be able to spread the paste onto your face but you don’t want it to be too watery.  Apply to your face and leave for about 20 minutes. (I added too much water)


This remedy is supposed to remove dead skin cells and blackheads from pores.  It was hard to get the mixture to stay on my face because I added a little too much water.  The paste was very hard to work with and would not stop dripping off my face.  Once it dried it would not stop cracking and leaving powder everywhere.

When you rinse both masks off, use them as a scrub.  Use warm water and exfoliate your skin as you wash the masks off. 


Neither mask got rid of all of our blackheads.  The almond honey mixture removed a few blackheads (nothing impressive) and made my sister’s skin extremely soft.  

The baking soda mixture only removed a bit more blackheads (still nothing impressive) BUT it actually made the blackheads easier to extract after I rinsed it off!!

These remedies were easy to make but for the minimal results we got, along with the mess these masks left, I'm still trying to find a better solution for DIY blackhead removal.

What DIY blackhead scrubs or masks have you found that work?

Thursday, April 4, 2013

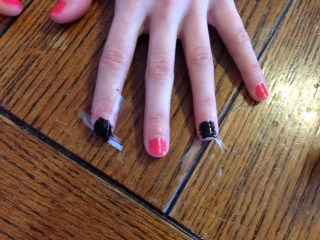
[FACEit] you don’t have to go to a salon to get cool nail designs

Nail salons can be somewhat expensive, the manicure doesn’t always turn out how you want, and sometimes they don’t even last longer than a day.  So skip the salon and try some nail art tricks at home!

For the technique I just tried all you need are two nail polish colors (one light and one darker), scissors and some scotch tape!

Apply a base coat if you desire, and then one layer of the lighter color. Then it’s time to start taping.  Let this coat dry while you decide what combination of lines, arrows, and angles you would like.   

Once your nails are dry start placing the scotch tape on your nails.  Make sure the tape is completely stuck to the nail, if you leave air pockets under the tape the nail polish will seep under and ruin your perfect lines.  Tape each nail before you begin the next step.

Next, paint the darker color over the tape, avoiding cuticles and skin.  Wait about 2 minutes before gently pealing off the tape and...

TADA! You just gave yourself a cool nail design at home, FOR FREE!

What creative nail designs have you tried at home?

Wednesday, March 27, 2013

[FACEit] Vaseline has many more uses than you think


Where do I begin? Let’s start at the top of our body and work our way down with the Vaseline.

  • If you dye your hair at home you can use it to prevent dye from getting all over your forehead.  Just apply the Vaseline around your hair line before beginning the process.
  • Put it on your eyelashes before you go to bed.  It helps thicken and grow your lashes.
  • Use it as an eye makeup remover.  I roll a q-tip through Vaseline and use it to take off my mascara.  It works better than any makeup remover I have ever purchased.
  • It can be used as a lip-gloss.
  • Apply it to the apples of your cheeks for a dewy glow.
  • Rub it into your elbows to keep them moisturized much longer than your lotion.
  • Massage it into your cuticles to keep them from getting dry and cracked.
  • Put it on your feet before you go to bed.  Sleep with socks on.  This will keep your feet smooth and moisturized.
  • Apply it to perfume points before spraying your favorite fragrance.  It will keep the scent on longer.
  • Mix it with sea salt and you have a new homemade body scrub!

What have you used Vaseline for?

Monday, March 18, 2013

[FACEit] your eyes are the windows to your soul, so they deserve a little more love


1. Use a green, chamomile, or black tea bags on your eyes to get rid of the puffiness.  Soak them in hot water for a minute and then dip them into ice water before laying down and putting them over your eyes.

2. Thin, light eyebrows can add years to your face so FILL IN THOSE EYEBROWS!

3. Using a light coloured, metallic shadow on your inner corners and around your eyes for a wide-awake look.  This will attract light and brighten your eyes up!

4. Heat up your eyelash curler with your blow drier for 15 seconds before you use it.  Your lashes will not only have a better curl to them but the heat sets them for hours!

What tricks do you use to beautify your eyes?

Monday, March 11, 2013

[FACEit] self-tanning towelettes are going to be your new favorite product!


Tanning, as well as its dangers, can be pretty pricey.  There are other ways to achieve the gorgeous glow you desire without the risk and I’ve tried more than a few.  My personal experiences:

The gradual tanning sprays, like Neutrogena MicroMist® Airbrush Sunless Tan (about $10), tanning usually go on clear and gradually get darker. 
The drawbacks, if you happen to spray too much so the spray drips down your body, you won’t see it until the spray is dry and there is what looks like a tan dripping down your leg.  You can imagine that being a little embarrassing.
The benefits, you don’t have to worry about orange hands!

The lotions come in tinted and clear.  L’Oreal Sublime Bronze™ Self Tanning Gelee (about $10) is the lotion of choice for me.  It goes on clear and gradually gets darker.
The benefits, it dries quick enough that I can still apply it when I’m in a rush and know it will be dry in a few minutes for me to get dressed.
The drawbacks, my cuticles are ALWAYS orange.  I tried putting Vaseline on and around my nail beds before I used the lotion and washed my hands with soap immediately after but I still had orange cuticles.

Towlettes! L’Oreal Sublime Bronze™ Self-Tanning Towelettes (about $10) are my new favorite.  The benefits, they have the prefect amount of solution on them, no guessing.  It goes on even and dries within minutes.  I use Vaseline on and around my nail beds and wash my hands right after and NO MORE ORANGE CUTICLES!
The drawbacks, none so far, will update if I start to have any problems.

Tips: I apply normal lotion all over on days I don’t use the tanner to keep the color even and to keep my skin moisturized helping to extend the life of the tan.

What self-tanners have you tried?